

Getting started with SHOP#
This documentation presents an updated overview of available functionality in SHOP. Many of the functionalities are presented through examples, listed under the “Tutorials and examples” menu on the left. For new SHOP users, the introduction example is recommended before looking into more advanced functionality. The documentation also contains sections on the SHOP API and the different data and file formats that SHOP can parse. There are also several searchable reference tables that contain an exhaustive list of all the objects, attributes, commands, datatypes, and licenses available in SHOP. The “Publications” chapter contains some of the most relevant scientific publications related to SHOP and short-term hydropower scheduling from the SHOP team at SINTEF Energy Research in Trondheim.
Quick start#
To get started coding your own models you can run the SHOP with the following options:
Use the vLab where pyshop is preinstalled in a Jupyter based environment
Run pyshop locally using predefined devcontainer with all the required dependencies and only download the SHOP license and binaries
Download the SHOP license and binaries from the Portal and install pyshop on your local computer
Launching code with SHOP vLab#
This documentation contains executable code examples that can be executed on the SHOP virtual lab simply by hovering  in the top right corner and select
  . This will redirect you to the virtual lab.
You can try it out here and now by clicking the to execute the code below.
print("Hello SHOP!")
Happy coding!
Run SHOP Locally Using Visual Studio Dev Containers#
Visual Studio Dev Containers lets you run a fully functional development environment using Docker and Visual Studio Code. This might simplify setting up pyshop for new users. Follow the guide below to setup the devcontainer for pyshop.
Installation#
Install the following dependencies:
Install the code editor called Visual Studio Code. Visual Studio Code is free
Install Docker: Docker desktop (might require a paid license depending on your organization), or a free alternative called Podman
Setup#
Create a folder called
.devcontainerin your root directory with a file calleddevcontainer.json. Your folder structure should look like the example below:
Copy and paste the contents of devcontainer.json into your
devcontainer.jsonfile.Create a folder called
binin your root directory and add the following files:libcplex2010.so,shop_cplex_interface.so, your shop license e.gSHOP_license.dat, shop pybind e.gshop_pybind.cpython-312-x86_64-linux-gnu.so. Your bin folder should now look like: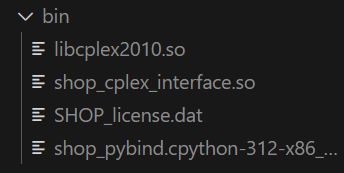
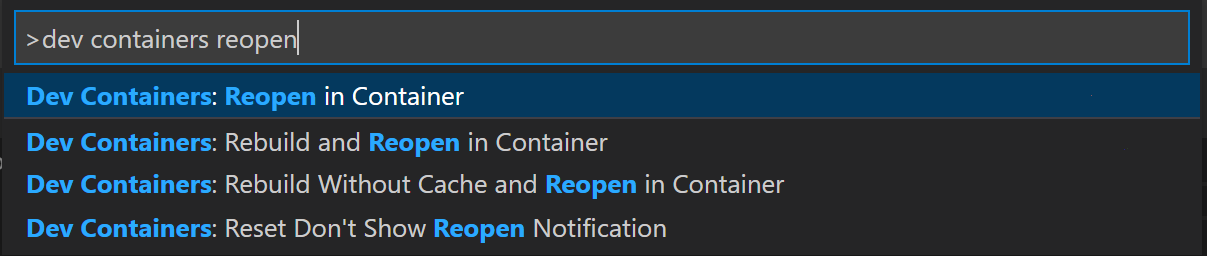
Open your project using the devcontainer config files by running the command:
More in depth guides on how to customize devcontainers can be found in the devcontainer documentation